Sunday, January 27, 2013

Two Great Tips For Putting Together Room Inspiration Boards


{one of my three finished inspiration boards}
I finished three inspiration boards, one for myself, and two other inspiration boards for the homes of my Sister S and Sister-In-Law C. I have two tips to share...

{a little color first...}
 TIP #1: Start By Painting The Board Your Wall Color

I used Benjamin Moore's Yarmouth Blue, and painted the center of a standard 22" x 28" poster board with the paint color. (I left white around all of the edges, with a bit more white at the top for the "ceiling")

{Benjamin Moore Yarmouth Blue HC-150}
I've used this color in the living room of our older house and loved it.  It was a subtle, shifting color - a soft pale blue/green in the daylight, and a deeper sophisticated blue/grey at night... It's one of Benjamin Moore's historic shades.

{three piles}
I grabbed old catalogs and magazines and started cutting. There were three very different moods I wanted for each very different home, mine in New York, my sister's in Oregon and my brother's in Pennsylvania. I was surprised how many items I clipped could have fit nicely in more than one board.

{Elmer's Repostionable Picture and Poster Stick}
TIP #2: Use A Repositionable Picture and Poster Glue Stick

This made it so easy to move the images around on the page. It was as if each clipping became it's own Post-It note! Cool!

{Rosie at work}
 Pull out a glue stick and kids come instantly running... Here is Rosie working on Aunt C's board. You can see Benjamin Moore's Brushed Aluminum paint brushed on the center of the poster board. This soft shade would look great in her new home.

{inspired by cars, and using his own purple glue stick!}
...and Son H had to come running to make his own version.

{my interior window seat sketch}
My house has a very open floor plan, with an open living/dining room and kitchen, and our newly built and not-yet-painted windowseat addition. (Right now our walls in our open areas are the color they were when we moved in three years ago, a tan shade and I am ready for a change. You can see the new color scheme I am dreaming of in this earlier post.)

{putting it together}
I had such a great time sticking and re-sticking down these pictures. Say what you will, but I don't think I'd have as much fun working this out with pixels on the computer!

{"Elle" Craftmade ceiling fan}

The board is truly for inspiration, all mood and color. I don't plan on buying anything exactly like in the photos - but for the ceiling fan! It's already picked out and at the top of the board.


 ...and I had already been given the Snake Plant, and placed it in a modern planter just like the one I pasted below the plant picture!

{like adding mascara - black on the windows BM Wrought Iron 2124-10}
 I'll paint the windowseat windows Benjamin Moore's Wrought Iron. I fell in love with black doors and windows in a place featured in House Beautiful Magazine years ago... I wish I could remember the name of the designer of that home. (Grant Gibson recently blogged about his black doors here.)

{blues and greens}
 I'm looking for eco-friendly thrift shop finds to paint black or white, and old wood pieces to harmonize with our antique piano. I want to make this renovation as Earth-friendly as possible.

...and ART! I can't wait to finally hang pictures on the walls. These black and white photographs are gorgeous. I printed many of my own photographs recently, and they are ready to go.

I'll share all three finished inspiration boards in my next post! If you try my tips if you make your own, let me know how it comes out!

Loretta

Friday, January 25, 2013

A Romantic Photoshoot for my New ETSY shop!

{photo shoot!}
Today I'm shooting my jewelry for my brand new Etsy shop!

 I've always sold my jewelry thorough galleries or at craft shows, but I've always wanted to be able to connect with the people who purchase jewelry online with both an Etsy shop and a shopping cart on my own website LorettaFontaine.com.  It's been a goal for a while now.
{Loretta Fontaine Amy reversible sterling silver earrings with Stuyvesant Fern miniature original photography}
In the past, most of my jewelry photoshoots involved a pure white background (see above!)

Magazine editors like the clean, white background because they have a lot of editorial freedom with page layouts. Photos with a white background are also ideal for my catalogs and line sheets. But I've noticed the photography on Etsy is all about MOOD, and using interesting bckgrounds to tell part of the story of the handmade products.

{Back to your nest when I am done!}
So I scoured the studio and house looking for "props", and since the Christmas decorations are still sitting in boxes in the basement waiting to be put away, I grabbed this little "nest" from a Christmas tree ornament I bought at the fabulous Experience and Creative Design in Schenectady. The adorable little bird it came with is letting me "borrow" his nest! Ha ha!

{the pottery we hold the kindling in was found at a yard sale in Vermont - LOVE it}
And then I grabbed for more "props" some of the twigs we use for kindling in our woodstove...

{my dining room table, inspired by Lauren Liess's Better Homes and Garden article}
Do you remember the post I did in 2010 with the Lauren Liess Pure Style Home inspired Holiday Lunch? I thought the green fabric I bought would be the perfect romantic backdrop for the Etsy photographs.

{I used the "reverse" of the fabric to lighten the mood...}
With fabric down, nest ornament in place and a few blue-painted blocks of wood I am ready to shoot photographs. Here's one necklace ready to go...

{penny and ruler}
One thing that is so hard to judge on sites like Etsy is scale - so I'm taking a photograph of each piece of jewelry next to a copper penny and a clear ruler in inches and centimeters. Not very romantic, but it will give people a great sense of the scale of the jewelry so there will be no "it's smaller than I thought!" or "it's much bigger then I thought!" when someone gets the jewelry in the mailbox.

(Yes, this has happened to me when I bought an adorable wooden puzzle on Etsy for my nephews and it was SO much smaller than I realized - even when they listed the dimensions.)


{Canon Macro Lens EF 100mm}
I'm using a lens with a very short focal range to make the backdrop of the photos blur into a gorgeous mix of greens, blues and rustic wood. Or, at least that's the lofty goal I have in my head! I choose jewelry that I thought would be perfect to give for upcoming Valentine's Day, and hope this "mood" I am trying to create works to set a romantic backdrop for the jewelry.

I'll share my new photographs soon! Any photography or Etsy hints of your own?
Loretta

Tuesday, January 22, 2013

Windowseat Additition Update: Icynene Spray Foam Insulation

{Icynene light density LD-C-50 classic foam}
We had our windowseat addition insulated with Icynene Spray Foam insulation, and I researched the process, but you don't get a good idea of the installation until the crew is at your door and you are in the thick of things! So here's a play by play of the process...
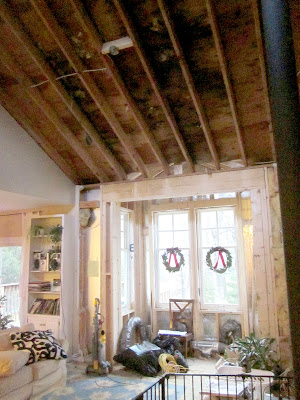
{windowseat addition ceiling, before Icynene}
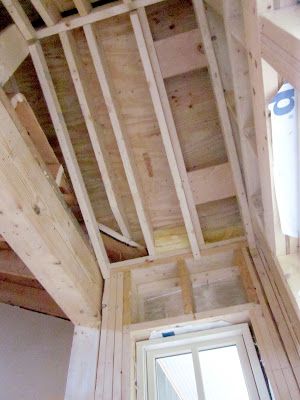
Here's the framing of the new windowseat addition before the Icynene foam was blown. (The glint of silver you see above the window is foil-faced sheets of rigid foam insulation that was added for extra R-value over the 2 x 6 stud walls.) We chose Northeast Spray Foam of Albany, New York as our contractors for the job.

{the wiring in the ceiling is for the new ceiling fan}
We have a cathedral ceiling in our living room, and we had Northeast Spray Foam remove the drywall and spray the high ceiling as well. (They also went into the attic and sprayed foam in the roof rafters AND sealed our crawlspace - a full insulation job for the house!)

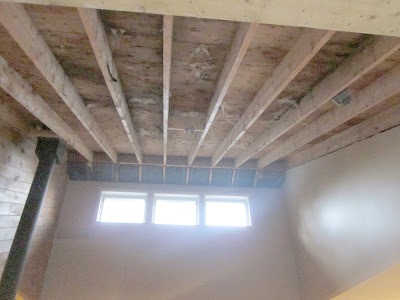
{another view of the cathederal ceiling - woodstove pipe to the left}
Back in the 70's, the builders never vented the cathederal ceiling. Today, a builder would add a "baffle" that would let air move between the insulation and roof deck from the soffit (the edge of the roof) to a ridge vent on the top of the roof. Or they might use an unvented SIP (Structural Insulated Panel).

We just had 2 x 10 studs with fiberglass. And worse, there were two potlights in the ceiling so moist air could flow right up those two weak spots in the insulation, hit the cold roof deck in the winter, and freeze! This photo was taken right when the insulation was taken down, and you can still see some insulation "froze" to the roof deck! The darker "wet" spots are thawing ice. Yikes!

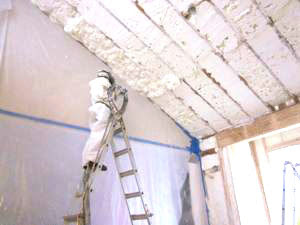
{The foam sets in seconds}
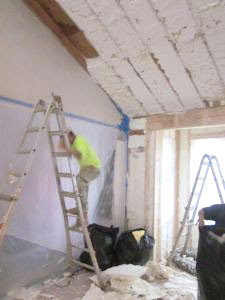
The whole job took two days. A big tractor trailer rig pulled into my driveway, and the crew of three sealed off the area with plastic and blue painter's tape and started working. In the rig, two liquid chemicals mix to form the foam, which moves through a hose into the house and gets sprayed through a trigger gun. The Icynene foam comes out HOT, and even in the winter this is a hot job. The person spraying the foam wears a full face mask that brings cold, fresh air from an additional hose from the truck to breathe.


There was a bad odor with the foam and an almost misty look to the air, and I didn't want to hang around too much when the crew was spraying. After the Icynene foam "sets" (within seconds) - it cools off and can be "shaved" down with a special blade where it extends over the joists or studs so there is a smooth surface for drywall. The black bags hold the shaved pieces of foam. I wish there was something to do with that extra foam insulation - I was told it went right to the landfill, sadly.
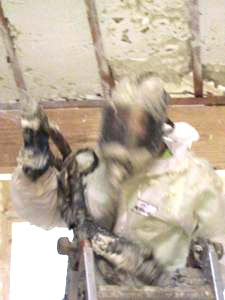
{sawing}
Here's a photo of the blade in action. He like a Japanese warrior! Sadly, the photo of the blade is blurred, but the blade looks like a giant serrated jigsaw blade. The thin blade is held between the two wood joists, and then the blade is moved back and forth by hand to saw away the extra insulation.

The red and blue bag is mineral wool insulation. The ceiling area around the woodstove pipe (not shown in this photo), by code, needs to have fire-proof insulation. They just needed a little bit from the bag.

{space age!}
A close up of the Icynene spray gun and hood. One of the members of the crew was female, and she did the spraying that day. You go, girl!
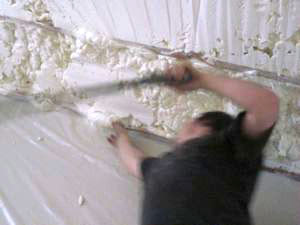
{messy}


This is not a neat process - you can see drips of foam all over the plastic sheets. The Icynene foams cures fast, so it was not sticky, but it STICKS very well to anything it touched.

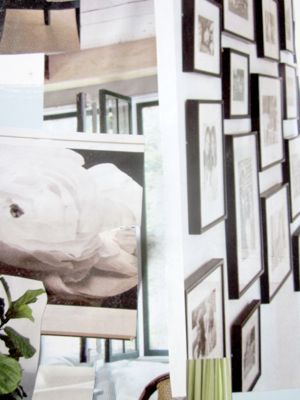
Here's a montage of the finished ceiling, with the windowseat addition towards the right side of the photo. The plastic sheets stayed up for one day before they were taken down. The area was vented for a day with a box fan, and the job was done. Hello warm house in winter and cool house in summer!

Loretta

Wednesday, January 16, 2013

Snow Delay!


 Today we woke up to a two-hour school snow delay! My husband is a high school math teacher, so he was the first up to celebrate. Then Evie, then Rosie and last up Son H. We had popovers for breakfast and a quiet morning as everyone headed out two hours late.

{Our tracks this morning in the snow - we have quite the crowd headed down our street!}
 I walk with Rosie and Son H to their elementary school. We are lucky that we live close to the school, and are joined every morning by a bunch of neighborhood kids and parents for the morning trip. It wakes me up in the morning!

{snow on a blue spruce}
 There is something beautiful about freshly fallen snow. I love how it clings to every needle of an evergreen. It's magic when the air is still and the snow is falling. It's as if the whole landscape is whispering "hush".

{dogwood}

{Winter's Black-eyed Susans}
Were you lucky enough to get snow this morning?

Loretta

Monday, January 14, 2013

Mad For Cara Cara Oranges

{love the ruby color of these Cara Cara oranges}
After the holiday sugarfest we seem to have had at our home last month, I'm working on my kids eating healthier, and realize my best chance is when they come home from school.

All three of my children come home from school HUNGRY, and there is nothing like a little hunger to get them to munch on anything - hence my best chance of the day to get something nutritious in them.

{Mad for Cara Cara, so sweet!}
The pharmacy at our local Hannaford supermarket had these beautiful Cara Cara oranges on sale. (And they were not in the produce section - they were right there in the pharmacy area! As a nod to good health. Thank you, Hannaford for recognizing food can be the best medicine!)

{Son H and his Cara Cara "smile!}
One of my goals in the new year is to have a healthy snack waiting for the kids when they get home. And these Cara Cara oranges were a hit!

The Cara Cara oranges, a unique mutation cross between the Washington navel and what people believe was a Brazilian Bahia navel, were first discovered in 1976 at Hacienda Cara Cara in Venezuela. The fruit has typical orange skin, but inside the flesh is a gorgeous ruby color.

What makes them great - sweet and juicy with one Cara Cara orange giving you 150% of your daily Vitamin C, 30% of your Vitamin A, 250 mg of potassium AND a healthy dose of Lycopene - the same disease-fighting antioxidant found in tomatoes. (Another type of "red" orange - the blood orange - does not have Lycopene...)

Cara Cara oranges from California are available December through April. I will be on the lookout for more this winter!

Loretta

Tuesday, January 8, 2013

Happy New Year! New Changes for the New Year...

{Portland, Oregon Spring 2012 Loretta Fontaine}
A New Year!

I'm thinking of some changes here at APPLESandRUBIES, namely a name and focus change.

When I started blogging in 2010, APPLESandRUBIES was a great name, as my life was a balance of my jewelry design business (the rubies) and everyday happenings (the apples!).

{Portland, Oregon Spring 2012 Loretta Fontaine}
Now in 2013 with ALL three kids in school, (Son H is in first grade), I have more time to pursue some goals that I've always been kicking around in my head.

I've written a book on Eco-friendly living, (Eco-Happy: Three Steps Towards an Eco-Friendly Life) and am developing new products (not just jewelry anymore!) in my studio that are earth-friendly.

{Portland, Oregon Spring 2012 Loretta Fontaine}
I'm in the final stages of editing my book: photo selection and placement, page layout... I realize this could take forever and need to give myself a good firm deadline to just get it done so the book can get into people's hands! (That is the goal, right?)

...and I've already developed and finished a new eco-friendly product - recycled paper notecards that feature photography from my book. I had them printed last October and brought them to the local craft and farmer's markets here in Albany, New York. The new recycled notecards came out beautifully and... Sold Out! I will be ordering more, soon and hope to do a recycled paper notecard giveaway on my blog as soon as I get them!

It was SO much fun to develop a new product, and I have lots more eco-friendly products in my head.

{Portland, Oregon Spring 2012 Loretta Fontaine}
So where does that leave APPLESand RUBIES? Okay, I LOVE the name, but think it's time to change the name of the blog to relate to what I'm doing NOW. I reserved a "new" blog name on both Wordpress and Blogspot and am going to work to get a new blog up on both platforms and choose my favorite.

Meanwhile, I'll keep writing on APPLESandRUBIES until the new blog is ready for a big unveil.

Do you have big changes for the New Year?

Loretta

p.s. Do you have a preference for a Blogspot or Wordpress Blog? I think Maria of Colour Me Happy and Camilia of Effortless Style switched to Wordpress. I would love some advice here...

Friday, December 28, 2012

A Bit Of Handmade...

{needle and thread}
 A bit of embellishment on a beautiful thrift shop dress for my wonderful Niece A...

{My niece picked her favorite embroidery floss colors - purple and pink!}
 The strawberry applique was from a two-piece baby outfit I wore as a kid. The ice cream cone fabric is a scrap from a pair of Son H's old shorts, and the purple and white stripe "ice cream" is fabric salvaged from a shirt worn by both Evie and Rosie. And before that the same shirt was worn by my cousin's daughter...

{finished!}
So much fun to find some time to make something special!

Loretta