 |
| {Icynene light density LD-C-50 classic foam} |
We had our windowseat addition insulated with
Icynene Spray Foam insulation, and I researched the process, but you don't get a good idea of the installation until the crew is at your door and you are in the thick of things! So here's a play by play of the process...
 |
| {windowseat addition ceiling, before Icynene} |
Here's the framing of the new windowseat addition before the
Icynene foam was blown. (The glint of silver you see above the window is foil-faced sheets of rigid foam insulation that was added for extra R-value over the 2 x 6 stud walls.) We chose
Northeast Spray Foam of Albany, New York as our contractors for the job.
 |
| {the wiring in the ceiling is for the new ceiling fan} |
We have a cathedral ceiling in our living room, and we had
Northeast Spray Foam remove the drywall and spray the high ceiling as well. (They also went into the attic and sprayed foam in the roof rafters AND sealed our crawlspace - a full insulation job for the house!)
 |
| {another view of the cathederal ceiling - woodstove pipe to the left} |
Back in the 70's, the builders never vented the cathederal ceiling. Today, a builder would add a "baffle" that would let air move between the insulation and roof deck from the soffit (the edge of the roof) to a ridge vent on the top of the roof. Or they might use an unvented SIP (Structural Insulated Panel).
We just had 2 x 10 studs with fiberglass. And worse, there were two potlights in the ceiling so moist air could flow right up those two weak spots in the insulation, hit the cold roof deck in the winter, and freeze! This photo was taken right when the insulation was taken down, and you can still see some insulation "froze" to the roof deck! The darker "wet" spots are thawing ice. Yikes!
 |
| {The foam sets in seconds} |
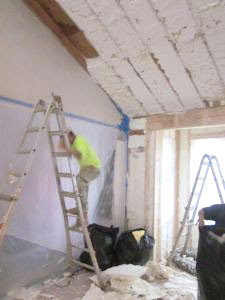
The whole job took two days. A big tractor trailer rig pulled into my driveway, and the crew of three sealed off the area with plastic and blue painter's tape and started working. In the rig, two liquid chemicals mix to form the foam, which moves through a hose into the house and gets sprayed through a trigger gun. The
Icynene foam comes out HOT, and even in the winter this is a hot job. The person spraying the foam wears a full face mask that brings cold, fresh air from an additional hose from the truck to breathe.
There was a bad odor with the foam and an almost misty look to the air, and I didn't want to hang around too much when the crew was spraying. After the
Icynene foam "sets" (within seconds) - it cools off and can be "shaved" down with a special blade where it extends over the joists or studs so there is a smooth surface for drywall. The black bags hold the shaved pieces of foam. I wish there was something to do with that extra foam insulation - I was told it went right to the landfill, sadly.
 |
| {sawing} |
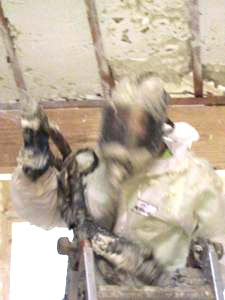
Here's a photo of the blade in action. He like a Japanese warrior! Sadly, the photo of the blade is blurred, but the blade looks like a giant serrated jigsaw blade. The thin blade is held between the two wood joists, and then the blade is moved back and forth by hand to saw away the extra insulation.
The red and blue bag is mineral wool insulation. The ceiling area around the woodstove pipe (not shown in this photo), by code, needs to have fire-proof insulation. They just needed a little bit from the bag.
 |
| {space age!} |
A close up of the
Icynene spray gun and hood. One of the members of the crew was female, and she did the spraying that day. You go, girl!
 |
| {messy} |
This is not a neat process - you can see drips of foam all over the plastic sheets. The
Icynene foams cures fast, so it was not sticky, but it STICKS very well to anything it touched.
Here's a montage of the finished ceiling, with the windowseat addition towards the right side of the photo. The plastic sheets stayed up for one day before they were taken down. The area was vented for a day with a box fan, and the job was done. Hello warm house in winter and cool house in summer!
Loretta


Loretta, how interesting! i never would have imagined the mess - it seems so neat on the HGTV shows, ha ha!
ReplyDeleteThere is one shot of your windowseat before the foam and it looks like a room in a quaint, rustic cabin will all the exposed wood and the wreathes on the windows. Just like a holiday photo in a magazine. Can't wait to see more of your progress!
Mac
wow, your ceiling is so high! the spray foam looks like a great way to insulate it and keep your heating bills down. Looking forward to more...
ReplyDeleteMackenzie- It does look a neat process on HGTV - but I've always seen them spray "closed cell" foam in walls studs. Ours was an "open cell" foam and much less dense and billowed out a lot as it cured.
ReplyDeleteWe had a closed cell foam (also made by Icynene - they have a bunch of different types of foam) sprayed on the walls of the crawl space, and looked much neater and easier for the workers to control the buildup.
The closed cell foam has a higher R value per inch, but the open cell lets water vapor pass through it, so the walls and roof can regulate any moisture better.
Loretta